Functions in Detail
These section provides detailed information on the various controls and functions of Network Monitor.
A Note on the Contextual Menu:
Many of Network Monitor's elements provide extended options that are accessible by their contextual menus.
You can access the contextual menu by right clicking an element or item (Apple Macintosh™ with a single mouse button: use command + click).
Please note that there are two items at the end of any contextual menu, which are not related to Network Monitor:
(The appearance of the menu may vary as the contextual menu is depending on the operating system of the computer in use.)
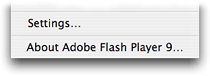
- The item "Settings..." relates to the global settings of the Flash Player™ plug-in.
- The item "About Adobe Flash Player..." opens a web page with information on the product.
(Use this to check the version of the Flash Player™ plug-in installed.)
Below these items are depicted as dimmed in order to separate these items from Network Monitor's own items.
1) Searching
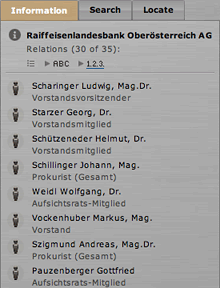
The most important part of the info-panel at the ride side pane of the application is the search tab. It is here where you usually enter into a new network view.
(You'll find the search tab already opened for you as enter the application.)
1.1 New Search
The most important part of the search tab is the search box "Name" at the top of the dialog. Enter one ore more search terms in any order. The search is case-insensitive and conjuncts any words by a logical "and". Special characters and their usual transliterations are equivalent ("ä" = "ae", "ß" = "ss").
1.1.1 Wild-Cards
The search "knows" the usual wild-card characters "*" (any characters) and "?" (any single character).
| * | any number of any characters (including none). |
| ? | any single character (Please note that special characters may be stored as multiple characters in the data base.) |
The asterisk (star) wild-card modifies the search behavior:
Normally any search terms are compared with any part of the name as stored in the data base. There is no significance of where a search term and the name match. Should there be a asterisk (star) in the search term only those names make valid results that match from the beginning.
| Examples: | |
| sch | matches "Scharinger" and "Gesellschaft". |
| sch* | matches "Scharinger" and other names beginning with "sch" only. |
| tech | matches "Technologie" and "Betriebstechnik". |
| tech* | matches "Technologie" and other names beginning with "tech" only. |
1.1.2 Search Phrases
Moreover Network Monitor provides a phrase search: Just enter a search term in double quotes (").
| Examples: | |
| wolf | to many hits |
| "wolf" | matches the name (or first name) "Wolf" only |
1.1.3 Search Options
There are two kind of search options by which you may refine your requests: You may search for a particular type of elements only, or as for affiliations (corporations), you may also search for specific regions and locations.
1.1.3.1 Restricting the Search by Type
| • | Type | Select the type of element (affiliations, persons, males, females, etc) to search for. |
1.1.3.2 Search Options for Affiliations only
Restriction by location are only valid for affiliations:
| • | Location | Geographical information is (city and district) is available for affiliations (corporations and foundations) only. Therefor they can be used to restrict search results for affiliations only. |
Example: How to find all foundations in the district Gmunden:
| Name | * (asterisk = any name) | |
| Type | Foundations (selected in the pop-up menu) | |
| District | Gmunden (selected in the pop-up menu) |
1.1.4 Top-Maps
By activating the check-box view as top map your request is immediately displayed as a special map:
This map shows the top 15 hits (sorted by the weight of influence) and the 10 top ranked related elements for each of them.
From a different data set: The network of Austrian top golf events and their most important participants.
1.2 Search Results
As you enter (a successful) search the search tab changes to a results' list.
On top of this list you'll find the sort options:
A B C sort by name 1. 2. 3. sort by global rank
To display a network around a selected item:
- Select an item (it will be highlighted to show the selection)
- Select a range in steps for the extent of network's environment using the radio-boxes at end of the list.
- Click the button "View selection"
The contextual menu (right click) of any of the list's items provides the following options (you'll find these options for any list view in the application):
| • | Show report ... | View a report directly from the result's list without displaying a map. |
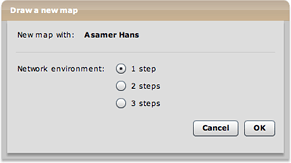
| • | New map ... | Opens a dialog where you can select the range for the network's environment. (This is equivalent to using the controls at the lower end of the list.) |
| • | Copy label | Puts a copy of the item's label in the clipboard of your operating system (e.g. for pasting it to a document of your word processor). |
| • | Search Google | Opens a new window with the google search results on this item. |
Double-clicking an item of the result's list opens the same dialog as the option "New map ...":
1.3 Switching Form Results to Search (and vice versa)
As you re-open the search tab you'll always see the search dialog.
In case that there was any search result before, you'll find a link to last results below the dialog.
Inversely you'll find a link "New search" at the top of the result list.
Search results are stored until there is new list of results available. This way you may view a specific map, go back to the last result and request another view.
1.4 Locating Positions
Sometimes it's hard to locate a specific element. You know it's there, that you've seen it already, but you can't find it again.
For this there is a special tab "Locate":
Just enter the name or part(s) of it in the search box. Network Monitor will display a list of matches.
Click an item to highlight it in the network view.
If there is any connection to the current target element, the shortest paths(s) to it will be highlighted all along. (c.f: sect. 2.1.4 Displaying Paths).
As in any list view any item of the list of matching elements provides the same contextual menu as the items of the list of search results.
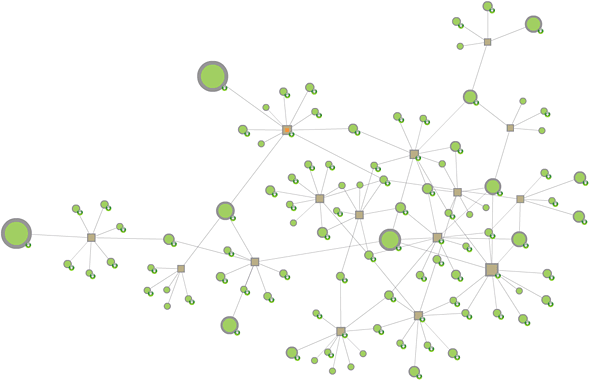
2) Network View
Generating and displaying maps of networks is a primary purpose of Network Monitor. Such a network view shows the elements (nodes) of a network and their relations (connections, ties).
These relations are the very stuff a specific network is made of.
Tip: You may stop the generation of a map anytime by hitting the "escape" (ESC) key of your keyboard.
2.1 Nodes
Nodes are of distinctive shapes: Squares represent affiliations (corporations), persons are represented by circles.
Nodes are of distinctive size, indicating the degree of immediately connected elements.
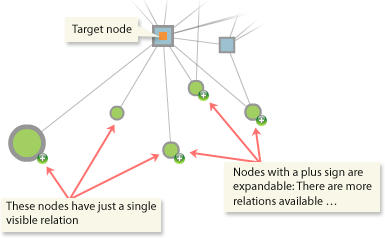
A small green icon showing a plus sign attached to a node indicates that there are more relations, ready to show, by which you may expand the current map. (see below)
2.1.1 Relations of Elements
The elements of the network are connected by mutual relations, which are depicted as lines (edges).
These lines and the connected elements are highlighted as you move the mouse pointer over a node to give you a helping hand in surveying the relations inside the network:
As elements are highlighted their labels show up and the connected edges are intensified. The node you are hovering over with the mouse pointer is drawn in yellow, the neighboring elements are marked by a yellow center. (In case you activated the option show labels the labels of the connected elements are drawn stronger than other ones.)
To retrieve more information of a relation, click a node to select it: the info-panel shows the name of this element, the count of visible relations and the total degree, and a list of any visible related elements. Every item in the list shows the name of the element and in a second line the type of the relation. (You may sort this list by name or by rank.)
By clicking an item you highlight the corresponding node in the network view. So you may identify them easily.
The contextual menu of this list's items shows the usual options for list items (show report, new map, copy label, search Google) and an additional option to expand the specific element (see below).
2.1.2 Expanding and Collapsing Nodes
You may expand a node, if it has any relations to other elements that are not visible yet.
Such a node has a small icon (showing a green plus sign) attached to it.
You may expand a node by double-clicking it or by the means of its contextual menu (right click).
Some of the nodes have neighbors which have only a single connection to another visible element. You may collapse such a node by selecting the according item from its contextual menu.
The illustration above shows three nodes at the lower left, which will be hidden, as you choose to collapse the target element. Some elements show a green plus sign, indicating that there are more relations available.
Note:
Please note that only the 30 most important neighboring nodes will displayed for any element by a single step of expansion. If there are more relations available, the node in question will keep showing the expand icon and you may retrieve the remaining nodes by the next step.
You may overrule this behavior by holding the SHIFT key while double clicking a node to show all available relations at once.
You can adjust this behavior in the options dialog.
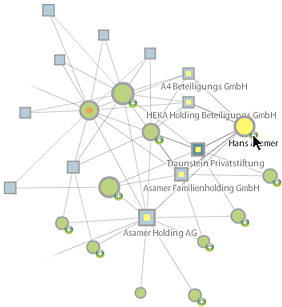
2.1.3 The Target Element
Every network view has a target element, which is marked by a orange center: This always the node that was the object of your last action. You may select any other node as the current target element by selecting "Mark as target element" from its contextual menu.
2.1.4 Displaying Paths
The target element plays an important role in finding paths. You can find paths by the means of the tab "Locate" of the info-panel or by selecting the according item from the contextual menu of any network node. (see below)
Path displays are another tool for surveying relations inside the network view. They show the shortest path(s) from an element to the target element by analyzing the structure of the network currently displayed:
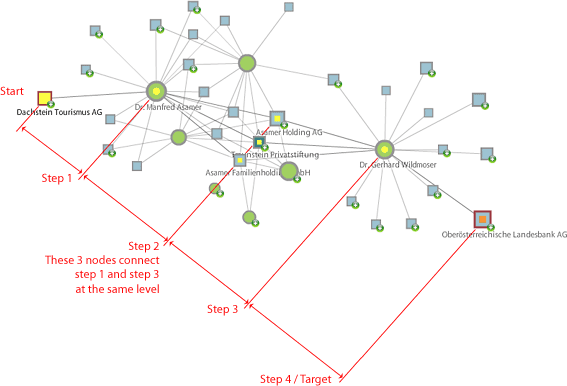
Please note that there might be other connections. The shortest connections must not be the best available. Anyway this tool can be of help in surveying the very structure of a network in a specific context.
The path display is only temporary: As you move the mouse pointer onto any element of the network view, it will change to normal highlighting mode. You may also reduce the map to the elements that form the shortest path(s) by removing all other elements from the view: For this select "Reduce map to shortest paths" from a node's contextual menu. (see below)
2.1.5 Options for Nodes
The contextual menu of a node in network view shows the following items:
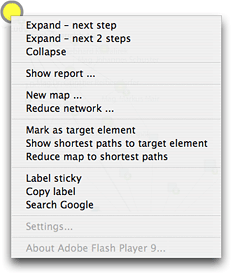
The items of the contextual menu:
| • | Expand – next step | Shows related elements that are not visible by now. (Equivalent to double-clicking a node.) |
| • | Expand – next 2 steps | As above, but the view will also be expanded by the neighbors of any related elements. |
| • | Collapse | Removes those neighboring elements from the view that have a visible connection to this node only. |
| • | Show report ... | Opens the report on this element. |
| • | New map ... | Draw a new map with this element in its center. A dialog opens to let you select the range of the environment of the this new map. |
| • | Reduce map ... | Reduces the currently visible map. All nodes that are outside a specific range from this element will be removed from the view. A dialog opens to let you select the desired range. |
| • | Mark as target element | Moves the mark to this element so it becomes the new center of the current view. |
| • | Show shortest paths to target element |
Searches and displays the shortest path(s) to the target element.(Cf.: displaying paths, locating positions) |
| • | Reduce map to shortest paths |
Searches the shortest paths to the target element and removes all other elements from the current view. |
| • | Label sticky | Keeps this label visible anytime. Use this option to keep selected elements in sight. (This option shows any effect only, if the check-box show labels is deselected.) |
| • | Copy label | Copies the label to clipboard of the operating system. Use this to paste an items name into any other application. |
| • | Search Google | Opens a new browser window with the Google search results for this items label. |
2.1.6 Shortcuts (Hot Keys)
In order to simplify the usage of Network Monitor the application provides a series of shortcuts to use together with a click on a node in network view.
These are only shortcuts to functionality also available by other means.
There are equivalent alternatives to accommodate to various national keyboard layouts:
| Function | Key + click at element | ||||
| Collapse | 0 | < | - | [ | |
| Expand, 1 step | 1 | > | + | ] | |
| Expand, 2 steps | 2 | ||||
| Mark as target element | M | T | |||
| Show report (info) | I | ||||
| Other Hot-Keys | anytime | ||||
| Stop rendering | ESC | ||||
| 1 step back | Z | (with focus on view only) | |||
2.2 Options for the Network View
2.2.1 The Contextual Menu of the Network View
By right clicking the background of the network view a contextual menu shows up providing the following options for the entire view:
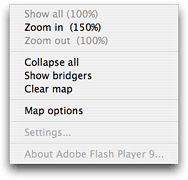
| • | Show all (100%) | Sets the zoom to 100% (show all). |
| • | Zoom in (xxx%) | Zooms in by 50% (Shows the new zoom factor in percent) |
| • | Zoom out (xxx%) | Zooms out by 50% (Shows the new zoom factor in percent) |
| • | Collapse all | Removes all nodes from the view that have currently only a one visible connection. (This function helps in removing clutter from the view: There are only those elements left which connect others.) |
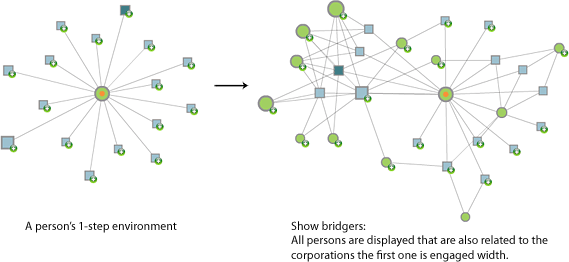
| • | Show bridgers | Expands the map by those elements that additionally connect the currently visible elements. (This function helps in exploring what the players have in common.) |
| • | Clear map | Resets the network view |
| • | Map options | Opens the application's option dialog for general settings. |
| • | Print this view | Opens the printing dialog for the current view (at the same zoom level). (The availability of this item depends on your user privileges.) The map is always zoomed to fill the page. You may use the options of the printing dialog to scale the hard copy. |
2.2.2 Scrolling by Drag and Drop
If in zoom mode the most simple way to scroll a view is to drag the view while holding the SPACE key of your keyboard.
As you hold the space key the mouse pointer changes to a hand to indicate that the map is in drag mode.
(You may drag the view only if you are in zoom mode; cf.: sect 4.2 Zoom.)
You may also zoom in and out of the map by the means of the scroll wheel of your mouse. (This function is not supported for Apple Macintosh&rade;).
3) The Control Bar
Using the controls and menus of the control bar you can control the level of information to be displayed in the map.

3.1 Menus for Colors and Values
By the means of these menus you can quickly survey the very nature of the elements to be seen in the view: Show partitions of elements as colors or display statistical values as chart columns to be projected onto the individual nodes. These Informations may be freely combined.
3.1.1 Colors for Affiliations
For affiliations there are the following options available:
(For color codes see the table below)
| • | Type | Type of the Affiliation: Corporation or foundation |
| • | Sector | Economic sector (type of industry) grey: no information available |
3.1.2 Colors for Persons
For persons there are the following options available:
| • | None | All persons are displayed as green circles |
| • | Gender | Men (males) are colored in pale green, women are displayed in violet / dark pink |
3.1.3 Color Codes
As a whole the following table of color codes is utilized:
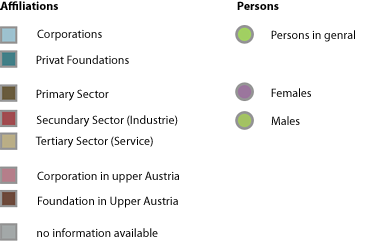
Please note that there are no players in the primary economic sector available in the current data base.
You can always inspect the meaning of the colors currently employed in the legend available at the lower end of the info-panel.
3.1.4 Displaying Values
By the means of the values-menu you can display statistical data on the individual nodes as relational chart columns.
Employing this the nodes change to a pseudo 3D perspective.
| • | Clique-Membership | An index (measure) for the individual integration in local cliques. |
| • | Brokerage | An index (measure) for the ability to broker between different parts of the entire network. |
| • | Turnover | Only available for corporations which are liable to publish them |
| • | Employees | Number of employees (as available), for corporations only |
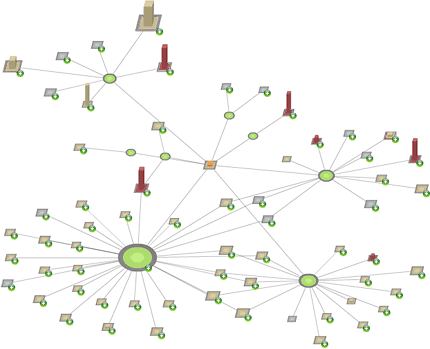
A map with chart columns representing turnovers and color codes for the economic sector.
These function are thought to provide a quick overview. – For detailed information change to the reports of the elements of interest.
3.2 Showing labels
Activate the
Even if you have deselected this option, you'll learn about a node's name by moving the mouse onto it.
Note: Displaying all labels permanently may slow down the speed of the display on older machines.
3.3 The Options Dialog
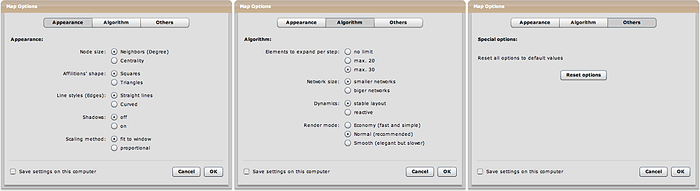
The options dialog provides some general settings by which you may the appearance and behavior of the application. You won't have to change these options regularly.
The Appearance Tab:
| • | Node size | The values to be used to calculate the size of the nodes: Based on the degree (number of direct neighbors, default) or on a node's centrality (weight of influence). (This option also affects the placement of the elements.) |
| • | Affiliations' shape | The shape used to draw the nodes of corporations and foundations: Squares (default) or triangles. (There is a general tendency in network analysis to depict affiliations as triangles, but squares provide better overview.) |
| • | Lines styles (Edges) | The drawing method used to display the edges (connecting lines): Straight lines (default) or curves. Sometimes by using curves the paths of crossing lines become more easy to survey. Also nice for elegant screen-shots. |
| • | Shadows | Display drop-shadows for nodes and edges: off (default) or on Drop-shadows slow down the display significantly. You may want to activate them for screen-shots and hard copies for a more impressive picture. |
| • | Scaling method | The scaling method used for the network view: Normally the map is scaled to fit the window (view port). Select proportional for an evenly scaled view that preserves the proportion without any distortions. |
The Algorithm tab:
While the options above only affect the optical appearance of the network view, these options control the general behavior of the application:
| • | Elements to expand per step |
Controls the number of additional relating elements per node to be displayed in one step of expansion. This setting also affects the density of the map.
|
| • | Network size | As you roam the network you may notice that distant nodes are vanishing like magic. You observe the network through a focused view: old nodes go, new ones appear. There are two settings for this automatic reduction of the network's extend : One for smaller networks which also reduces the calculation load for your computer (default) and a second one for bigger networks. (The first one reacts more to the extend of the network in steps, the second one more to the number of visible elements. Both of them reduce first the smaller, less important nodes.) |
| • | Dynamics | There are two settings that control how the network reacts to new elements:
|
| • | Render mode | The real time rendering of networks is a laborsome business: There is no way to just calculate the positions of the nodes. Your computer has to approximate the solution step by step. Network Monitor employs maybe the best and fastest algorithms there are, but real time rendering puts some load on your computer. To accommodate your needs and likes there are 3 settings to chose. (The algorithms are so adjusted that they result in very similar visualizations. So the map remains the same even as you change the settings on the fly.)
Usually you won't want to change these settings and stick with the default values. |
The tab Others:
Here you'll find a button to reset the application's settings to default values.
The settings won't be applied unless you quit the dialog by clicking the "OK" button.
The check-box Save settings on this computer
By activating this option all settings are stored permanently on your local machine, ready for you the next time you enter Network Monitor. By activating this option also the settings for sorting, the visibility of labels, and the color scheme are preserved.
Note: Depending on the security settings of your Flash Player™ plug-in, this option may remain without any effect. You can access this setting by selecting the item "About Adobe Flash Player..." to be found at the end of any contextual menu. This will open a tiny dialog. In this select "Local Memory" and adjust the slider to provide a minimum of memory to the application.
3.4 The Back Button
By clicking the back button at the right side of the control bar you may reset the map to the state just before the last action. (This applies for any steps of expanding or reducing and the drawing of new maps.)
Please note that the back button of your web browser has no effect on Network Monitor.
4) View Controls
Located directly below the network view you find the controls for the view port of the network visualization.
4.1 Color Schemes
Everybody has her/his likes and dislikes, also there are varying conditions of light, or you may want a crisp display for video projection.
For this Network Monitor provides 2 color schemes: A bright one with a white background and dark lines and a cool dark theme with a dark blue background and light edges. (Both schemes implement the same color codes. Cf. sect. 3.1.3 Color Codes)
4.2 The Zoom Slider
By the zoom slider you may adjust the zoom level of the network view. (100%–500%)
100% always shows the entire network. The projection scale may vary depending on the need for space.
As you zoom in, scroll-bars become visible to let you adjust the visible portion of the map. You may move the map just the same by holding the SPACE key and dragging the map with your mouse. (The mouse pointer will change to a hand to indicate the drag mode.)
The scroll wheel of your mouse provides another way to zoom the view. Just spin it up and down to zoom in out of the map. (This function is not available for Apple Macintosh™.)
4.3 The "Remote Control"
The "remote control" is another way to control the view port:
Just click its icon at the right side of the zoom slider and the remote control will appear in the lower right corner. Click its center to drag it around where ever you like. Click one of its arrow buttons to scroll the view. Hold SHIFT while clicking these buttons to zoom the view.
By another click on its icon, the remote control hides in its sinking.
Additionally the contextual menu of the "remote control" provides the following options:
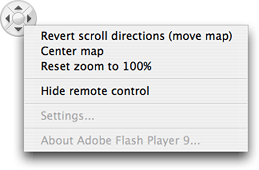
| • | Revert scroll directions | Changes the direction of the scroll action: Scrolling the view (default) or moving the image |
| • | Center map | Re-centers the network view (scrolls to the center) |
| • | Reset zoom to 100% | Resets the view to show the entire map |
| • | Hide remote control | Equivalent to clicking the icon in the view controls. |
4.4 The Indicator for Network Activity
There may be short delays while Network Monitor connects the data base.
During these phases a small spinning indicator becomes visible in the center of the view controls. It indicates that Network Monitor accesses the network (internet, LAN) and is waiting for response.
